Form is one of the user interface between users and database. In the case of MS Access
database, the form is user interface between the user and the table. To add, delete, edit, and save a record, a user is not allowed (forbidden) to do so directly through the table. Database management systems such as
MS Access, mySQL, SQL Server are an integrated database. So if we do edit a record
directly in a table, other table(s) may be disturbed, so that the database may corrupt,
become out of sync, or possibly be crashed. For that reasons, we should use form
to add, delete, edit, and save a record. Other than that, form can be used as a
navigation, guideline, even alert when an error occurred.
How to create form using Form Wizard in MS Access
To create a form using Form Wizard, do the following steps:
- Highlight the table tblMainAccount
- Click Create tab, choose More Form on the Forms Group, and click Form Wizard.

Click button to add all the Available Fields to Selected Fields. Click next button to continue.
 - Choose option Columnar and click next to continue

- Choose Access 2007 and click next to continue. You may choose another style you would like, later.

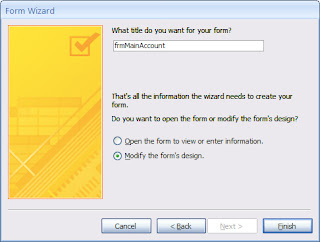
- Type frmMainAccount as the form name, choose option Modify the form's design, and click Finish button to edit the design.
- Form frmMainAccount has been created. The design will look like this:

- Highlight frmMainAccount label and double click to rename the title into Chart of Account - Main Account just like this:

- Highlight + symbol on the top left corner just like in the picture below:

Inside the highlighted area, click right mouse to display the shortcut menu and choose Layout - Remove to remove the group layout to make individual layout. You may adjust the field width by dragging the border as per you like. - If you click Views - Form View, finally, the form frmMainAccount will look like this:

- To save the format of the current form, so that you can apply this format to other forms, do the following steps:
- Switch the form to Layout View, click Format tab,
- Choose more on the AutoFormat group, and click AutoFormat Wizard ... to Manage Auto Formats.
- Click customize... button and
- Choose Create a new AutoFormat based on the Form 'frmMainAccount'.
- Type 'AutoFormat1' in the Style Name, clik OK to confirm.
- Click OK to finish. Your AutiFormat1 is ready to format other forms.


Windows Forms Wizard control for wizard form creation
ReplyDelete